Monday, December 23, 2013

Current Git branch name in Terminal

To know which branch is active now, we need to check git status. But Here i describe a technique that enable your terminal to show current branch.

If you use linux for OS then just add the following code to .bashrc file in your home directory:

function fetch_git_branch () {
  git branch 2> /dev/null | sed -e '/^[^*]/d' -e 's/* \(.*\)/ (\1)/'
}
 
RED="\[\033[0;31m\]"
YELLOW="\[\033[0;33m\]"
GREEN="\[\033[0;32m\]"
NO_COLOR="\[\033[0m\]"
 
PS1="$GREEN\u@\h$NO_COLOR:\w$YELLOW\$(fetch_git_branch)$NO_COLOR\$ "
 
Once you put this code on the specified location, then you need to reload your .bashrc or re-enter your terminal window by closing previous window.

To reload .bashrc, follow this command:

source ~/.bashrc
  
Also, If your terminal is not default colour activated  when you open terminal window, then just add following line to the .bashprofile in your home directory:


[[ -s ~/.bashrc ]] && source ~/.bashrc
 
If you are on mac, you should put this code to .bash_profile in your home directory. For windows, it is set by default. No need to add extra care!

Saturday, November 30, 2013

Polymorphic use of Gmail Account

Last several month ago, i was busy with some module test which is developed by me and all test needs to different mail account to reproduce scenario that is arise on the production server. I initiate the test on staging server and use my gmail account.

My gmail account is: naim.cse07@gmail.com and i use it as different combination with "." and "+"  character like bellow:

  1. naim.cs.e.07@gmail.com
  2. na.im.cse.07@gmail.com     
  3. na+im.cse07@gmail.com       

To know more about that. please take a look at this llink http://gmailblog.blogspot.com/2008/03/2-hidden-ways-to-get-more-from-your.html

Install Java JDK 7 on Ubuntu 12.04

I install the  package which provides by Oracle Java JDK 7 including JRE, the Java browser plugin and JavaFX.  I followed several step to configure Java JDK that is mention bellow:

1. To add our PPA and install the latest Oracle Java (JDK) 7 in Ubuntu, use the commands below:


                                 sudo add-apt-repository ppa:webupd8team/java
                                 sudo apt-get update && sudo apt-get install oracle-jdk7-installer

2. After the installation you have enable the jdk:

                               update-alternatives --display java

3. Check if Ubuntu uses Java JDK 7

                               java -version

If all went right the answer should be something like this:

                              java version “1.7.0_07″
                             Java(TM) SE Runtime Environment (build 1.7.0_07-b10)
                             Java HotSpot(TM) Server VM (build 23.3-b01, mixed mode)

The version can be vary and don't worried about it. This may be upper than my version.

4. Check what compiler is used:

                            javac -version

The correct answer should be like this:
                           
                          javac 1.7.0_07

5. Adding JAVA_HOME to environment
                          
                          Edit /etc/environment and add JAVA_HOME=/usr/lib/jvm/java-7-oracle to the end of the file.

First open a Terminal (Applications → Accessories → Terminal), Or just press Ctrl+Alt+t, then enter:

                       sudo gedit /etc/environment

Append to the end of the file:

                       JAVA_HOME=/usr/lib/jvm/java-7-oracle

6. Uninstalling Oracle JDK 7
                            If you want to uninstall the Java JDK, then follow the bellow command:

                      sudo apt-get remove oracle-jdk7-installer
          

Wednesday, August 14, 2013

Connfigure xdebugger with phpstorm

I assume that, we have already configured xdebugger(http://www.xdebug.org/docs/install). After add xdebugger you follow this instruction to configure debugger with phpstorm

1. Add easy-xdebug addons for your firefox browser by following link

    https://addons.mozilla.org/en-US/firefox/addon/easy-xdebug/

   Or you can add addons for google chrome browser by using the following link:

   https://chrome.google.com/webstore/detail/xdebug-helper    /eadndfjplgieldjbigjakmdgkmoaaaoc/related?hl=en

2. Then go phpstorm IDE and set DBGp Proxy by going
        settings->PHP->Debug->DBGP

   and set the properties of

       IDE key: PHPSTORM
       Host: localhost
       Port: 9000
3. Now we need to set some xdebug config to php.ini file. Open php.ini file by following

         sudo gedit /etc/php5/apache2/php.ini

  command and then paste the bellow config:

        xdebug.remote_connect_back = 1
        xdebug.remote_enable = 1
        xdebug.remote_handler = dbgp
        xdebug.remote_mode = req
        xdebug.remote_port = 9000
        xdebug.remote_host=127.0.0.1
        xdebug.remote_autostart=1
        xdebug.idekey='PHPSTORM' 


4. Then put your debug point in php file, set listner by click tools listner symbol and go to browser.

5. In Browser enable addons-bar from view->toolbar->addons->easy-xdebug and click to initiate easy-xdebug session.

Or, For google chrome addons, simply press ctrl+shift+X and activate the browser session listener.

6. Then enter your url and enjoy the debugging.

Happy Debugging For php script :)

ERROR: Error installing pg (Failed to build gem native extension.)

When you face problem to install Postgresql(pg) gem during bundle install for Ruby on rails project, then you need to install first the following gem:

sudo apt-get install postgresql
sudo apt-get install libpq-dev

then gem pg install will be successful when you attempt again by bundle install.

Thursday, May 23, 2013

How i know, is apache mod_rewrite is enabled

To know about the apache mod_rewrite module is enabled, we can follow two technique. One is using phpinfo other apache_get_modules function.

Let we use phpinfo function first,
  1. Create a file on your localserver root directory and renamed it something like this "phpinfo.php".
  2. then, add this,

    <?php echo phpinfo(); ?>

    and save it.
  3. Then go to your browser and write address like: localhost/phpinfo

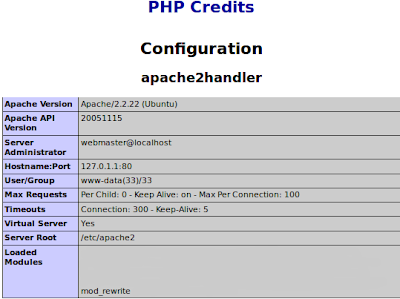
    there you see a pic like this


    Look at Loaded Modules and i viewed here only mod_rewrite. Because i already enabled it. If you do not see anything like this, it assume that you have not enable mod_rewrite module.

 The another technique is,
  1. Create a file on your localserver root directory and renamed it something like this "mod.php".
  2. Then add this code snippet,

    <?php
    print_r(apache_get_modules());
    ?>
  3. Then go to your browser and write address like: localhost/phpinfo

    there you see a array like this

    Array (
                        [0] => core
    [1] => mod_log_config
    [2] => mod_logio
    [3] => prefork
    [4] => http_core
    [5] => mod_so
    [6] => mod_alias
    [7] => mod_auth_basic
    [8] => mod_authn_file
    [9] => mod_authz_default
    [10] => mod_authz_groupfile
    [11] => mod_authz_host
    [12] => mod_authz_user
    [13] => mod_autoindex
    [14] => mod_cgi
    [15] => mod_deflate
    [16] => mod_dir
    [17] => mod_env
    [18] => mod_mime
    [19] => mod_negotiation
    [20] => mod_php5
    [21] => mod_reqtimeout
    [22] => mod_rewrite
    [23] => mod_setenvif
    [24] => mod_status
    )
  4. I highlighted the mod_rewrite module. Here it exists because of i have this module already enabled. If you have not this, you need to enable this module.
 

Enable Mod_rewrite on Ubuntu (Apache2)

If you have .htaccess file with some rewrite rule that you need for your desire app.
But the rewrite rule is not working. There will be one of the reason is your mod_rewrite apache module is not enable or loaded. So you need to enable it.

For example, if you use a cms like wordpress,  permalinks for wordpress or another CMS is not working for same reason.

Now I am going to enable mod_rewrite apache module by using a simple command which is bellow

sudo a2enmod rewrite


This will enable mod_rewrite for apache2 in ubuntu. But we need to update Default apache2 config to AllowOverrides from .htaccess files or any rewrite rules created various cms like wordpress, joomla, drupal etc

Open the Default file by following command :

sudo gedit /etc/apache2/sites-available/default
 
Then looking the text "AllowOverride None" and changed it with "AllowOverride All" and restart apache by following command:

sudo service apache2 restart 

Mod_rewrite will enable now on ubuntu systemm runing on apache.


Tuesday, May 21, 2013

How get PHP Apps error log in Linux OS

Many time, we need to see what actually happened when we run PHP based Web App, It is especially for when you need to debug some issue :)

So lets start by its using terminal, just paste this command and see the log :

sudo tail -f /var/log/apache2/error.log 

Configure virtual Host in linux OS Environment

By following the bellow instruction, we can make the local host as virtual host and can use as like as sub domain locally 


1. make available site config from copy the default one. Here is my site will be  naimrajb.com and i renamed it with "naimrajb.com"
  
   sudo cp /etc/apache2/sites-available/default /etc/apache2/sites-available/naimrajb.com

2. Open the new created file for set configuration root and others : 
  
   sudo gedit /etc/apache2/sites-available/naimrajb.com
 
   here set the following config:

        ServerName naimrajb.com //which site name will be
        ServerAlias www.naimrajb.com //which site name will be alias

       DocumentRoot /var/www/NaimRajb_Project_Folder    //where you put the main  project directory
    <Directory /var/www/CrowdRock1/>
        Options Indexes FollowSymLinks MultiViews
        AllowOverride all
        Order allow,deny
        allow from all
    </Directory>

3. Enable new created virtual site by following command

   sudo a2ensite naimrajb.com

4. Restart apache server

   sudo service apache2 restart


5. Open hosts file

   sudo gedit /etc/hosts

6. Then add your site in hosts file

   127.0.0.1    naimrajb.com

All is done :)

Now browse naimrajb.com